Local Authorization
By default eSign uses an out-of-the-box addin to configure Authentication and Authorization based on eSign local users,
that can be configured from eSign’s esign.config file.
Default Users
Unless configuration security.local.defaults is explicitly set to false in esign.config, eSign will always create a user admin with password admin capable of calling all of eSign’s APIs.
This configuration must ALWAYS be set to false in productive environments.
|
Create Local Users
To create local users for your project, from esign-home directory, open config/esign.config and add in properties a new configuration called security.local.users.
This configuration is an array of String, and you can add an entry for each user you which to create:
{
	...
	"properties": {
		...

		"security.local.users": [
			"[username1]=[password],[comma_separated_roles]", (1)
			"[username2]=[password2],[comma_separated_roles]" (2)
		]
	}
}| 1 | Creates first user with the assigned roles |
| 2 | Creates second user with the assigned roles |
The pattern of each entry is the following:
"[username]=[password],[comma_separated_roles]"-
The username is the name of the new user to be created in eSign
-
The password is the password used to login the user.
-
The comma_separated_roles is the list of all roles that the user will have
A role is a aggregator of permissions, and the permissions determine which eSign APIs the user will be able to call.
|
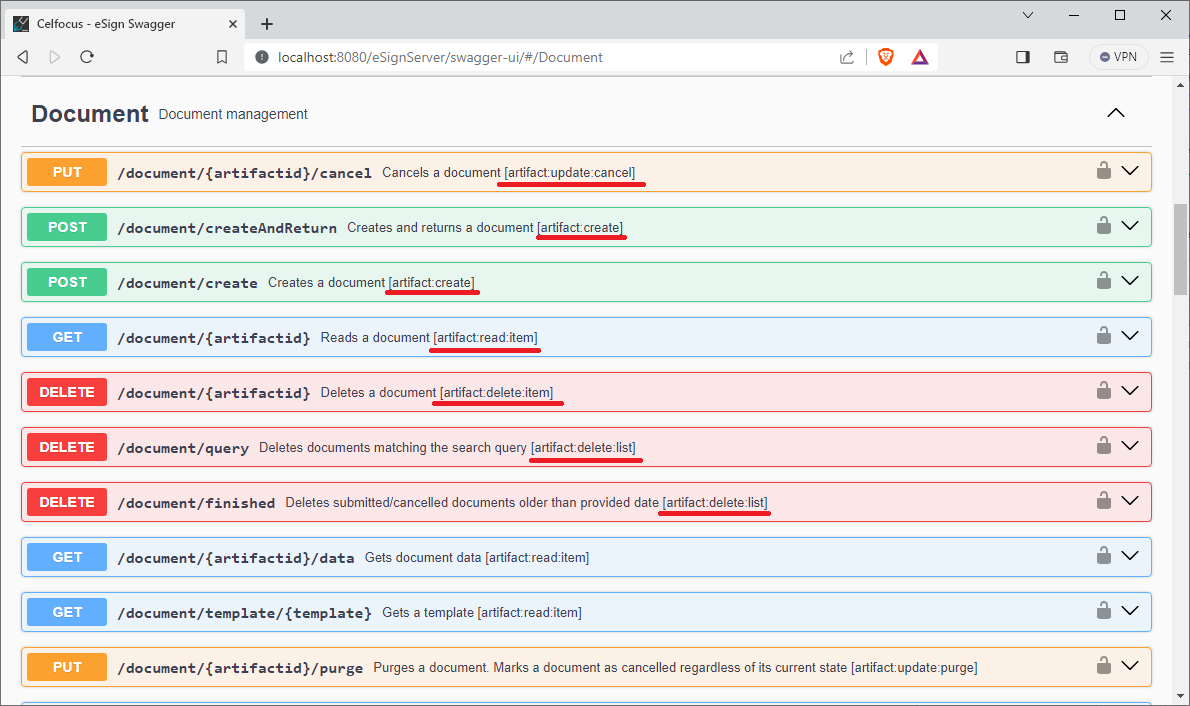
To cherry pick the required permissions check the Swagger UI Portal.
Example
Below is an example of eSign configured for two users:
{
	...
	"properties": {
		...

		"security.local.users": [
			"admin=${enc:wlW5gJ91b0cbm/Y2AlEXkw==},all", (1)
			"mathews=myPassword!,service,monitor" (2)
		]
	}
}| 1 | Creates a user admin with an obfuscated password that has role all |
| 2 | Creates a user mathews with password myPassword! that has roles: service and monitor |
|
In productive environments ALWAYS protect your passwords with eSign’s encryption feature. See: Obfuscated Values. |
Create Roles
Default Roles
eSign always ships with the following roles:
| Role | Permissions | Description |
|---|---|---|
all |
* |
All permissions |
service |
artifact,signature,compliance,batch,audit,log |
Access to business APIs. Create and manage documents, signature, … |
maintenance |
truststore,crl,configuration,scheduler |
Access to maintenance and configuration APIs (not standard business) |
monitor |
analytics,monitor,configuration,log:read,scheduler |
Access to Monitoring Portal with read/write permissions |
compliance |
compliance:validate |
Access to Compliance Portal |
viewer |
viewer |
Default role to open documents in eSign (Automatically managed) |
Custom Roles
To create custom roles for your project, from esign-home directory, open config/esign.config and add in properties a new configuration called security.local.roles.
This configuration is an array of String, and you can add an entry for each role you which to create:
{
	...
	"properties": {
		...

		"security.local.roles": [
			"[role]=[comma_separated_permissions]", (1)
			"[role2]=[comma_separated_permissions]" (2)
		]
	}
}| 1 | Creates first role with the assigned permissions |
| 2 | Creates second role with the assigned permissions |
|
Permissions can contain wildcards (*). For instance permission: artifact:* (or simply artifact) means that the user will have all permissions under artifact. This includes artifact:read, artifact:write, and so on.
|
Example
Below is an example of eSign configured for two users:
{
	...
	"properties": {
		...

		"security.local.roles": [
			"documentReader=artifact:read", (1)
			"documentManager=artifact:create,artifact:update,artifact:read" (2)
		]
	}
}| 1 | Creates role documentReader that only has access to read-only APIs over documents |
| 2 | Creates role documentManager that has permissions to create, update and read documents (but not for other operations, such as delete) |
To cherry pick the required permissions check the Swagger UI Portal.